Spring BootをDockerで始める
Quick Start Guideは以下にあります.以下をIntellij経由で実行しようとしてもうまく出来なかったので記録しておきます.
https://spring.io/guides/gs/spring-boot-docker/
docker fow windowsのインストール
以下からdocker for windowsをインストールしてください
全てよしなにやってくれます.なお,WSL2をカーネルにインストールしてください,といったエラーがWindowsの再起動時に表示される可能性があります.この場合,リンク張ってある通り,手順 4 – Linux カーネル更新プログラム パッケージをダウンロードするを実行して,WSL2をインストールします.
https://docs.microsoft.com/ja-jp/windows/wsl/install-win10#step-4—download-the-linux-kernel-update-package
Spring Bootアプリケーション
Spring Bootアプリケーションは公式サイト記載のものと同様のものを使用します.これは別に今まで作成したSpring Bootアプリケーションのいずれでも勿論問題ないです.
以下のクラスを作製します.
package hello;
 import org.springframework.boot.SpringApplication;
 import org.springframework.boot.autoconfigure.SpringBootApplication;
 import org.springframework.web.bind.annotation.RequestMapping;
 import org.springframework.web.bind.annotation.RestController;
 @SpringBootApplication
 @RestController
 public class Application {
 @RequestMapping("/")
   public String home() {
     return "Hello Docker World";
   }
 public static void main(String[] args) {
     SpringApplication.run(Application.class, args);
   }
 }
Dockerfileの準備
所定の位置に”Dockerfile”を作製します
Dockerのrun configurationの設定
Dockerfileを選択し,Dockerfileを指定します.また,Container nameに任意で名称を付けます.
下記の場所をクリックし,Docker for Windowsを選択します.
Binding Portsを設定する
hostのportとdockerのportのbindingを設定します.serverを8080で起動させる場合,以下のようにしてhostの8080とcontainerの8080の接続を設定します.

実行する
一度,mvn packageを実施してから(build後のtargetフォルダ中の***.jarが作成されてから),先ほど作製したdocker pluginを起動します.
正常に終了できれば,以下のようにdeployがsuccessした旨が表示されます.
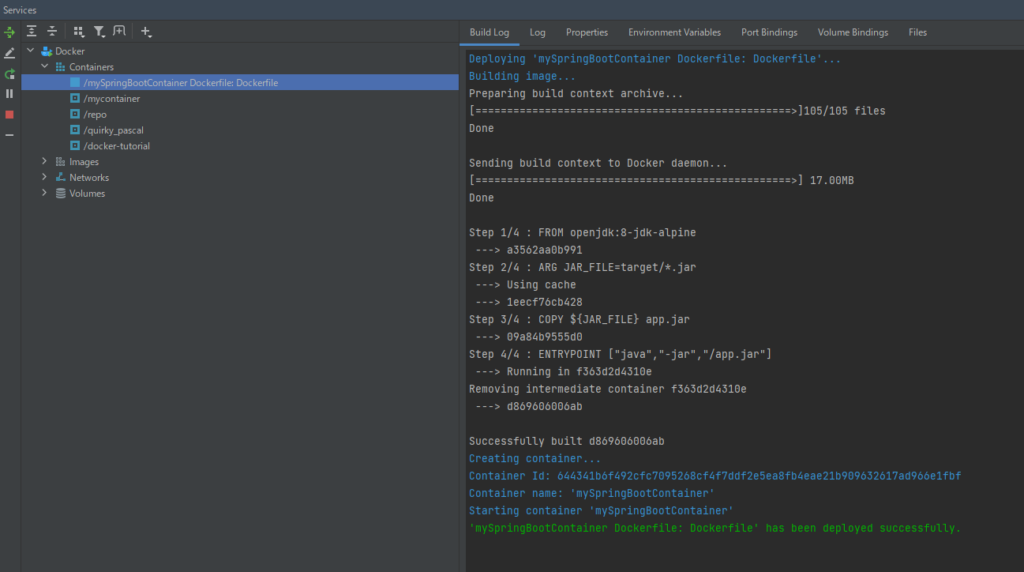
docker for DesktopのアプリケーションでもContainerが起動していることを確認することができます.
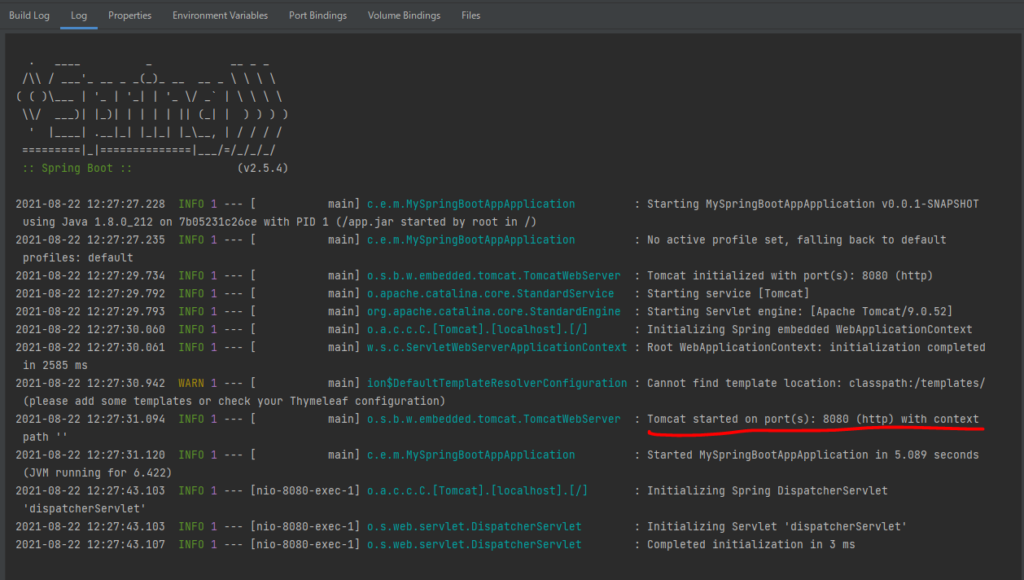
また,LogコンソールにはSpring Bootが起動し,Tomcatが8080portで起動した旨が表示されます.(これは通常のSpring Bootのログ出力と同様です)
localhost:8080にアクセスする
ブラウザでlocalhost:8080にアクセスします.

Troubleshoot
Docker起動時にDocker Daemonに接続できない
dockerが正しく起動していない可能性があります.Docker for Desktopを再起動し,正しく起動できていることを確認してください
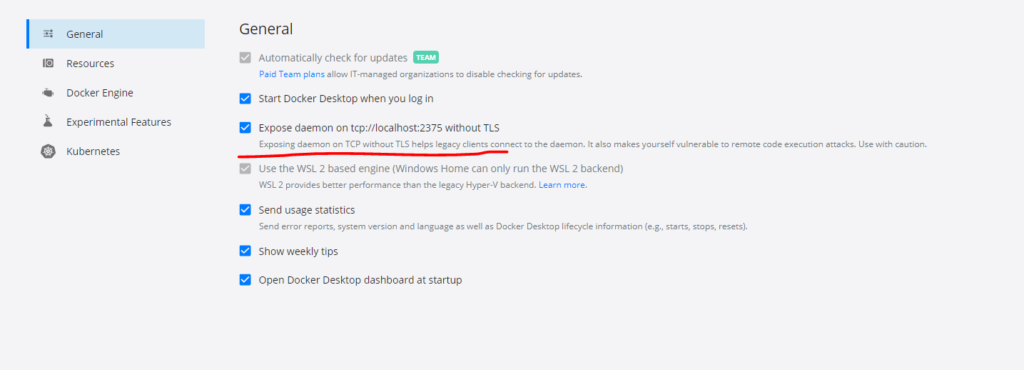
また,Docker for Windowsの場合,場合によってはTLS接続では上手くいかないことがあるようですので,以下にチェックを入れます.(通常はチェックなしで接続可能です)
また,上記設定後に,IntellijでTCP Socketで接続するにRun Configurationを変更します.
8080portに接続できない
WindowsのFirewallでブロックされている可能性があります.Firewallを外しましょう.
IntellijのDocker Plugin詳細を知りたい
以下が詳細なリンクです.結構詳しく書いてくれています.基本的にRun Configurationで設定していることは,docker run -xxxxx のオプションに相当する箇所になります.そのため,同様の単語でdocker documentの当該コマンドの部分を確認すれば,やりたいことを実行できるようになります.
https://www.jetbrains.com/help/idea/docker.html